Low Balances are often also called Inversions in the Yoga space1 and I bet you already can name many of them.
- They involve balancing on support – this support often is your elbows that rest against your legs or your torso.
- Low Balances, like the name suggests, also involve a low center of mass in comparison to a straight handstand that has a very high center of mass and therefore is very difficult to balance compared to a Crow Pose.
This makes many inversions, such as the various armbalances used in the yoga world very accessible for beginners and a great tool to practice balancing from one’s hands, while conditioning the wrists to bear weight. Often when embarking on the journey to learn a handstand, exactly these two are the areas that need the most attention, as both come unintuitive at first.
Throughout this post, we’re going to look at the most common families of low balances and how to practice those to get the first grasp. We also take a glimpse at the more advanced stuff and how the easier versions tie into the advanced ones, such as a Crocodile.
What are the different Types of Inversions?
The Crow or Bent-Arm Stand Family

The first family of lower inversions we’re going to look at are the different Crow Poses, Crow Stands, or arm-supported Bent-Arm Stands, depending on the context you train in. The latter name hits its main characteristics home:
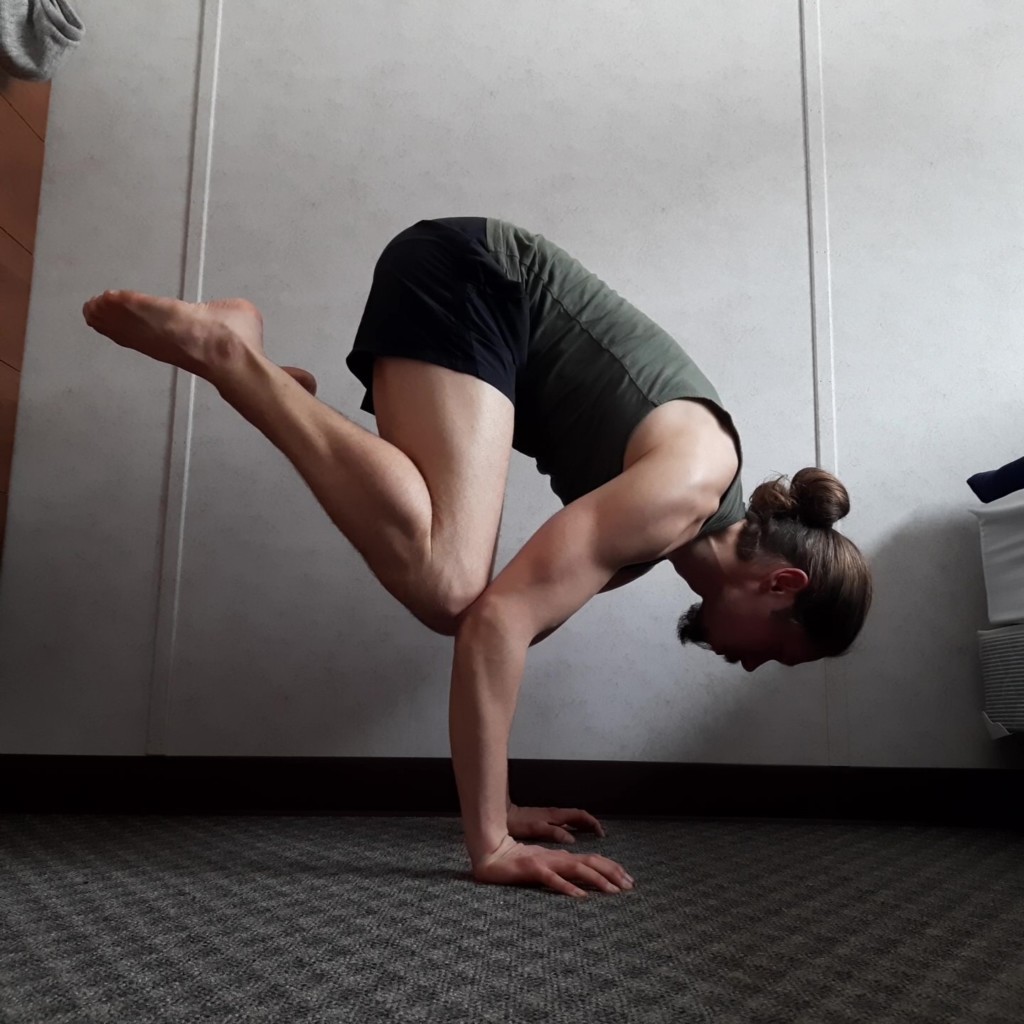
- The Crow is supported by your legs being placed and actively pushed into both of your triceps.
- This helps with the weight and placing your center of mass (your hips & torso are the heaviest) over your base of support (your hands).
- Your highest point (your toes) are much closer to the floor compared to a straight handstand – meaning you have a low center of mass which makes balancing a lot easier.
All of these points make the normal Crow Stand a very accessible and rewarding pose. The biggest hurdle will be to master the fear of falling onto one’s face while developing the strength in the shoulders, and control in the hands necessary to sustain the pose. Once accomplished it is a very easy balance to hold and enables beginners to understand how one balances from one’s hands – and correcting the processes of going over forwards (falling into overbalance) and falling back to one’s feet (correcting underbalance).
Especially correcting overbalance – you do so by pushing your finger into the floor – can be practiced very well. In that manner, you can condition your wrists to bear weight as a whole and your fingers to develop the specific strength necessary to successfully grip the floor and avoid falling over. This will translate to other armbalances and wall handstands.
That said it is a highly rewarding pose to learn especially if an other goal of you is to learn a free handstand. A crow is also an important hurdle towards learning different Calisthenics moves as it is the first step towards a Bent-Arm Stand and Handstand Pushup.
There are many different crows out there, especially in the Yoga sphere many weird poses exist and people bend in all imaginable ways while balancing their legs on top of their elbows. And I honestly never trained any of those fancier shapes – most of them are party tricks that are very much like the crow regarding the difficulty of balance but demand a bit, sometimes a fucking lot, more flexibility. The most common types within the family of Crow Stands are:
- The Standard Crow – with both of your legs resting on top of your elbows
- The Crane Pose – a Crow with straight-arms and a great way to get a first glimpse at the Tuck Planche
- Single-Legged Crow Variations – a Pose on its own or way to get stronger for an entirely unsupported Bent-Arm Stand
- The Side Crow – Fun to play with with bent and straight legs as the rotation adds another layer of complexity, but more of a party trick
- Bent-Arm Stands – Basically a Crow without your legs resting on top of your elbows, either with the legs tucked in or straight. It also is the bottom of a handstand pushup and the hardest part of that movement.
- Airbaby – A Crow Pose, but on one arm. The Airbaby is an entirely different beast regarding its difficulty in comparison to the Crow Stand. This one is quite common in breakdancing.
The Elbow Levers
Elbow Levers are another type of armbalance with a very low center of mass, even lower than the Crows. If you recall, a low center of mass means that your highest point is relatively close to the floor, compared to for example handstand shapes of various kinds. In comparison, they are even easier to balance than Crow Stands. The Crux with elbow levers is to achieve to lift your head and torso up the floor. This now is important: It is mostly achieved by leaning forwards and putting weight into your hands. No jumping or pressing relentlessly into the floor needed.
Looking at elbow levers there are not too many variations – the most common ones are:
- The Standard Elbow Lever with tucked, straddled, or straight legs
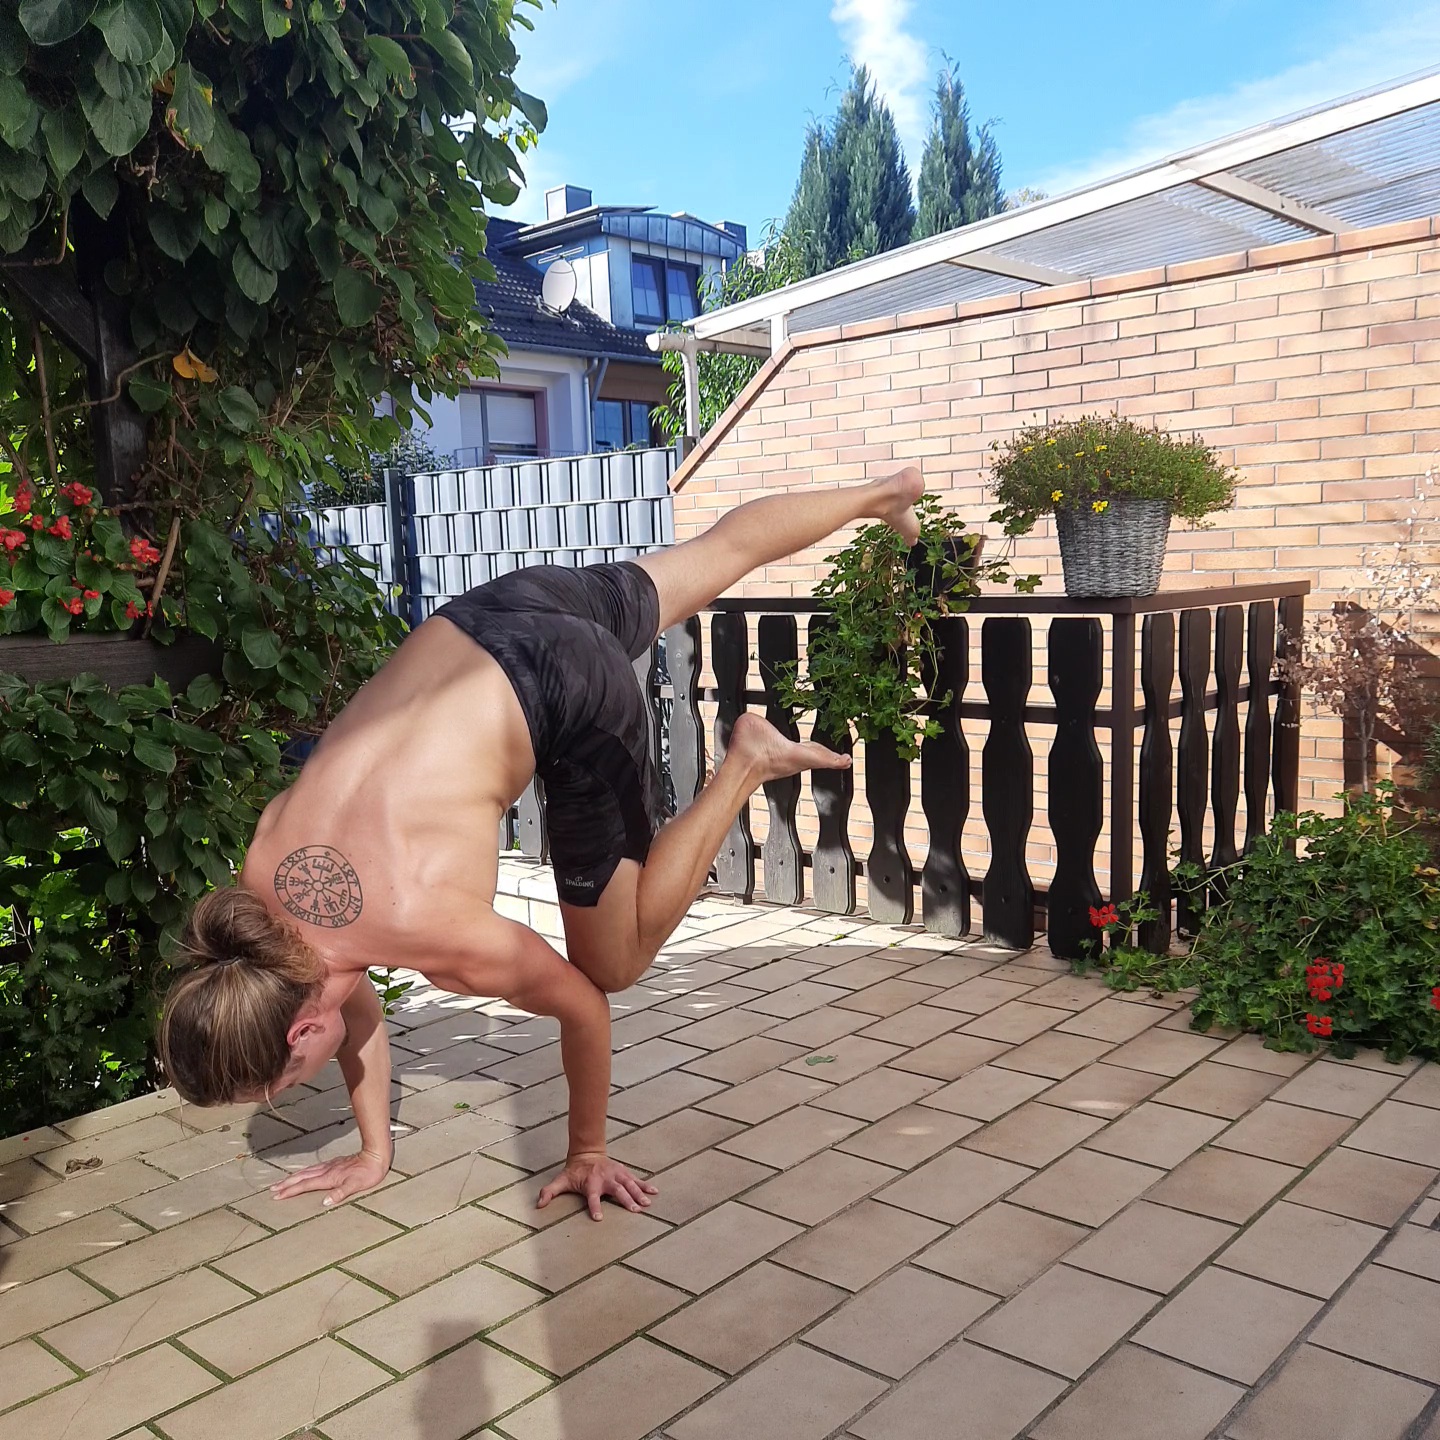
- The Crocodile – a one-armed Elbow Lever that is quite common to see with handbalancers. Another common name is a Peacock.
- The Side Crocodile – a one-armed Elbow Lever that adds a twisting motion to the equation. Most common in breakdancing.
The first, the Elbow Lever, is an easy armbalance that every beginner can pick up quite fast. It does not involve lots of strength, neither the tedious learning process of how to balance nor lots of technique. With normally healthy wrists and a bit of technique in mind, everyone can learn this skill. Later more on that and the most important cues.
The Crocodile is a further evolution of the Elbow Lever taking it onto one arm. To stay there you need a lot more technique, know how to sidebend your body, and condition your wrists to be able to bear your entire bodyweight. Nonetheless, compared to an Airbaby, even one-armed handstands a Crocodile is by magnitudes easier to pick up and a great way to develop an early feeling for these kinds of moves.
The Side Crocodile is basically a Crocodile with a twist that comes from your rotator cuff. Nonetheless, as you still place your bodyweight onto your elbow it is a fairly manageable position that needs some practice.
The most rewarding Low Balances to learn at the Beginning
With all these inversions, the question is: where to start?! Fortunately, most of them are fairly easy to balance in comparison with even easier handstand shapes. The Crow Stand and Elbow Lever are very accessible low balances also for beginners that are not able to stand on two arms but want to start somewhere. They also come with the benefit that they enable you to stand on your hands from early on – which will condition your wrists to bear weight. That is a huge issue normally when people want to learn a handstand or certain poses as modern life seldomly requires wrist loading unless you are running a smithery or work as a floorer.
For those into handbalancing or Calisthenics for a while learning Crocodiles or the Airbaby, can be a journey in itself and fun to practice alongside other skills. You can still make great progress with those two if you practice them just twice a week for a few sets. Especially if a huge part of your training takes up more rigid skill and strength work for certain skills, they add some fun and feelable progress to your training. Nonetheless, for both, you should already be experienced with two armed handstands, as they both put a lot of pressure onto one single wrist at a time.
The first Exodus: Learning the Crow Pose
Beyond the Crow and Elbow Lever, a handstand, as well as more demanding positions such as a Crane or Side Crows, are great things to pick up. These add more complexity to the movements and benefit greatly from your wrists already being able to bear some weight. I would consider those as Layer II exercises2.

The biggest obstacle when learning the Crow is the fear of falling onto one’s face. As most learn this position at an early stage in their training career, folks start out without a lot of handbalance-relevant strength, a lot of experience on one’s hand, nor strong wrists. While the technique might be easy, conditioning your brain and trusting your hands to bear your weight (ultimately avoiding you too kiss the ground head-on), takes repetition. This is why learning the Crow Stand can take a while at first, although it is considered an easy skill.
The first starting point should be practicing the leaning component of the Crow. Starting in a Squat one simply puts some of their bodyweight into their hands – over time the goal is to put more and more weight into both hands. This can further be practiced by lifting up one leg at a time for reps (e.g. 3 sets of 6-8 lifts per side) or short leans into balance onto both hands to build up your capacities (e.g. 3 sets of 4-8 leans into holds of 3-5s each).
Finally, you should be strong enough to lift both legs up the floor. It is crucial though to not jump from the feet – the only thing you want to do is to lean forward until all of your bodyweight rests on your hands. The lifting up occurs from the shoulders that take over and carry your weight – instead of your toes. Therefore: NO jumping, only leaning.
When first starting out, for God’s sake put a pillow in front of your face. Although falling onto your head is not all too painful, it is something you can easily avoid with some cushioning.
Once you can hold the Crow for some time (10-30s) this exercise is becoming even more useful and can be used to understand the balancing process that has to occur when you are in a handstand. You then can build up the finger strength necessary to avoid falling over, while conditioning your wrists to bear load for longer periods of time (e.g. 5-10 sets of 30-60s holds). At that phase, it is a great exercise to incorporate alongside early handstand exercises such as wall walks and belly-to-wall handstand holds.
Built Strength with the Crane
The Crane raises the bar substantially compared to the Crow as the strength demands rise by straightening both arms. Although your arms still rest on your triceps your shoulders now need to protract strongly and push forward, very much like in all the different planche variations.
What makes the Crane a lot easier compared to a Tuck Planche for example is the small degree of forward lean as well as your knees that do not need to float off the floor. Nonetheless is the Crane a great straight arm exercise and a big achievement to even hold for 3-5s. This strength will teach you a lot about how a planche works and help will condition your wrist to the stress.
When training the crane turning out the hands roughly 45° will help a lot to reduce the stress onto the joint. While training this position a straight arm position is very important as it promotes the right workings at your shoulder joint and scapulae. They have to push actively forward and you will likely feel if you are doing it right as stress felt onto your anterior deltoid and biceps.
Two great exercises to enter the Crane are the Crane Leans & the Crow to Crane Push. For the former, you lean with straight arms into the pose. If you aren’t strong enough to lift off your legs off the floor, you can hold it with foot support end eventually work towards hovering in a Crane for reps of ~3s. The process is very much like I described building the Crow Pose. The latter exercise teaches you to push from a Crow up into a Crane. While this might sound harder, I found it to be an easier entry, especially if you did some weight training in the past. The crux here consists of changing from a bent-arm supported position into one where you push with straight arms actively forwards.
Pick up the Elbow Lever along the Way
The Elbow lever will be a breeze to learn for most. Nonetheless, it looks cool and is a felt achievement that provides momentum!
The most important part is to find the right position for the elbows. You rotate your arms inwards (external rotation at the shoulder joint though) and place the bony part of your pelvis above where it connects to the femur and forms the hip joint (Anterior Inferior Iliac Spine for all the medical nerds out there) onto them. What must happen to them is the often overlooked, yet crucial, forward lean. This lean enables your weight to shift entirely onto your hands. Many make the mistake of not shifting and instead jump up with the legs – before falling back down immediately.
To adjust the difficulty you can go through the classic shapes of tuck -> straddle – > straight with the tuck being the easiest to balance and requiring the least amount of lean. Another tool that can help is an elevated surface such as higher Parallettes or a cube found in most gyms. Balancing on something elevated enables your legs to drop below parallel and still stay on your hands. This tactic can also be very beneficial when practicing harder variations like a Crocodile as it tends to be easier. Avoid it though for Side Crocs or Airbabies, as the way to the ground you fall is substantially higher and therefore the pain self-induced also.
How should can I incorporate Low Balances into my Training?
Most low balances are nothing that needs a fuckton of work – like a handstand or other Calisthenics skills. Chipping at a selection of them once or twice a week is sufficient. I would choose one or two low balances you want to learn – let’s say Crow & Elbow Lever and train them twice a week.
If you’re new to being on your hands and Calisthenics, these two positions likely will challenge you technically and strength-wise. In that case, placing them at the beginning of your workouts (as the skill part of your training before training the purely strength-focused exercises) will yield the best results as you are still fresh and fully there. Later on, in your training placing them towards the end of your training can also be an alternative. I in particular like to pace them towards the end of my skill sessions, as they require practice but aren’t comparably complex in technical demands to handstand shapes or jumps. They are more challenging strength-wise and need to start from the correct setup.
Regarding sets and reps, I would go for a linear progression model anywhere from 2-5 sets and 3s-45s holds. When starting out maybe 2 holds for 3s will be a challenge, a goal then could be to progressively increase the amount of overall time spent in that shape. Maybe after one cycle, you can hold a position then for 5x5s which is clearly progress. Probably your efficiency, form, and understanding will also improve.
Despite the linear progression, just getting quality balances in for a set amount of time is also a great way to perform some quality work. You could for example outline 5 minutes for the Crow and 5 minutes for the Elbow Lever without counting sets and hold time, but rather wing it and go for quality.
And with that small outlook on these two possible progressions models, I leave you alone and hope you have fun earning a few new skills! While some like the Crow and Elbow Lever will likely come quickly to you, some like a Crane or Crocodile might require some honest work. Anyways, the journey will be fun, and if you are into other kinds of handbalances probably a welcome relaxation from the tedious grind. Most low balances come relatively quick, and one can quickly play around with them and add variation. If you have any questions or want me to cover the more advanced low balances, I can do so in another post. Just leave me a request down below, as always.
Keep balancing,


